Workflow, Take Two: Shooting Tethered and Capture One

One of my early posts on Still Life With walked through my workflow of taking food shots in my studio (ie, my kitchen). Well, I recently realized how much a seemingly small change has made to my overall workflow. That change was starting to shoot tethered to my laptop, and it’s had numerous impacts on the steps I follow.
To shoot tethered, I have a long cable that attaches to the USB port on my camera (still the Canon 20D) and my MacBook Pro. I’m using Phase One’s Capture One which allows me to capture directly to my Mac. It’s an expensive app ($499), but the free Canon Raw software has problems with the Intel-based Macs (problems being it doesn’t work)… plus Capture One is a stellar piece of software that has great tools for adjusting white balance and exposure.

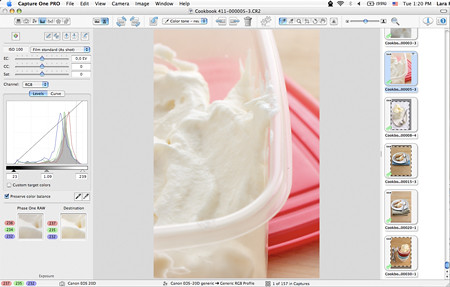
The benefit is that you see the results of each shot as you take them… so you know what problems are lurking and can fix them before the next shot. To get the most control to fix exposure, I’m shooting in manual mode where I set both the aperture and the shutter speed for the shot. It’s easy to see if I’m under or over exposing the image, as I see a histogram of each shot… this allows me to quickly correct any exposure problems in camera… the best place to do it. Despite improvements in camera’s abilities to figure out the right exposure, the camera doesn’t know the shot I want to take as well as I do… and I end up much happier with my shots when I take that control myself. Take for example this photo for this month’s Flickr Still Life With White theme.

As I shot the image, I was able to adjust the shutter speed to get a nice, wide histogram giving me lots of variation in the whites of the ice cream. Little nooks and crannies have shadows and the highlights are bright but not blown out. If the image was too dark or too bright, I’d know it immediately and stop up or down to correct the problem.
Similarly, before each shooting session, I set my camera’s custom white balance. To do this, I just shoot a white card (I actually use a 5×7 piece of photo paper), and then set the camera’s custom white balance setting to this. On my 20D, I have to shoot untethered to take the white card shot and get it written to the card… then I have to set the Custom WB function in the menu as well as setting the the white balance selector on the top of the camera.

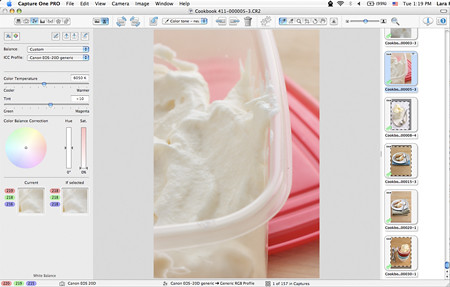
Even though I set the camera’s white balance, I often find that I want to tweak it a bit. Here’s where Capture One really shines. Correcting white problems in Photoshop is incredibly tricky, requiring multiple complicated tools like color balance and curves. In Capture One, it’s a breeze. Simply select the eyedropper tool and click on what should be a neutral color. Most of the time, it gets it right. Sometimes, the white balance is right, but it’s not the look I’m going for. A quick tweak of a slider for color temperature and one for tint gives me the control I need.

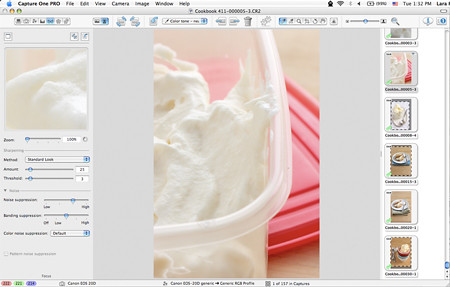
The other incredibly helpful tool in Capture One is the magnifying glass, which allows you to very quickly get a 100% view of a small section of the image to check for sharpness. I find that shooting with my 100mm I can focus pretty easily, but with the 50mm or 45mm can be much trickier to get just the right plane perfectly sharp. It may even look sharp in the screen sized image, but a look at the 100% image is the only way to really tell… and that’s pretty important for prints.
There are a ton of other great features too… the rotate is elegant, a set crop is easy to apply to a whole set of images (as are all the other edits), and you can even click the shutter from the app reducing camera shake even more than using a remote. But, back to my workflow.
I cull the bad images as I go along, so at the end of shooting, I’ve got the three to five shots that I was trying to get. While shooting takes a bit longer because of the inevitable tweaking of the photos along the way, the whole process is a bit quicker. Plus, I find that I get more exercise… instead of sitting on the couch for a few hours editing photos, I edit standing up (or sometimes squatting on the floor when the sun is making it hard to see my monitor when it’s on the counter!)
When I’m done shooting, there is no more weeding out the good ones from hundreds and almost no need to adjust exposure or color… just some fine tuning and cleaning up spots and bits. Capture One makes it easy to process the Raw files and output as either TIFF or JPEG. I save all the CR2s (Raw) and output as TIFF. This does take up a lot of space, but I’m happier having the highest resolution files around that I can.
Of course, the TIFF files don’t do me much good for my blog. As I’m cleaning up any imperfections on the TIFFs, I decide if the photo is going to get posted to Flickr or my blog. If it does, I slap a small watermark on it and save the watermarked version out to a folder with all my watermarked images. If the images don’t need any fine tuning (ie, removing random dust, etc.) then I will just output the JPEG file from Capture One. It has a great tool for adding a watermark as part of the conversion process. In fact, I’m getting to the point that I rarely use PhotoShop on my photos at all. It’s encouraged me to make more careful styling choices… to remove distracting crumbs or fingerprints before I shoot, just so I can save the overall post-processing time.
I don’t care too much about the watermarked photos once I’ve posted them, so I can clean this folder out fairly frequently to minimize space. All the other photos live on my laptop and get backed up to another machine in my house about once a month (I should do it more frequently). The server has automated backups, so once the images are there, they are on two separate hard drives. I keep a fair number of recent photos on my laptop, but start expiring raw and TIFF images as I need the space.
When I’m shooting for a client, I don’t add watermarks… instead, I create a whole set of images in different folders… a folder for TIFFs, full-sized JPEGs, websized JPEGs and Thumbnails. Creating the websized images is quite straightforward, but the thumbnails are a bit tricky if the client wants them to be square instead of proportional. For square thumbs, I like to create them by hand to ensure I get a good crop on the image. Of course, some images don’t look good square… but most have some interesting crop that will work. I also apply a bit of unsharp mask to the thumbnail sizes to crisp them up a bit. I do all of this in Photoshop.
Shooting tethered and investing in a product like Capture One isn’t for everyone. It’s expensive and in some ways rather restrictive. But, it’s also done more to improve my photography than anything else. The instant feedback on exposure and DOF has taught me to anticipate for future shots, and I never would have started shooting manual without that kind of feedback.
Technorati Tags: Food, Photography, Photoshop, Tips
Hi Lara,
I’ve read about this software even at Matt’s… As it’s extremely expensive for a non pro like myself, do you know if there are freeware of softwares like Capture one?
Many thanks
Hmm.. not quite following everything here as I’m new to photography. You have a way of making it approachable, though, and I’ll be reading and re-reading your informative blogs frequently. Many thanks for being so generous with your time and expertise. This is a fantastic site!
Susan
Food “Blogga”
Piperita – Yes, you are right. The software is really intended for pros or really high end hobbiests with loads of extra $$. I know that Canon has capture software that is free though… if you are running an OS that it supports. My MacBook Pro doesn’t. I assume that Nikon has something similar as well. Those should let you shoot tethered so that you get the advantage of seeing the photos as you take them and adjusting the white balance. They probably won’t have the other features though.
Susan – Not to worry… this is a fairly advanced post, but I thought some folks might find it useful. If you find that you have specific questions though, feel free to send them my way!
-L
Actually, Photoshop (Bridge) has a 1-click eyedropper tool that you use to correct your white balance in a RAW file. It’s incredibly simple and works brilliantly.
It’s interesting to follow your path in CaptureOne, however. I’m always interested in better customizing my workflow.
hi L!
I have been reading your blog for a couple of months now, and love it~ keep up the good work! What I am curious about learning more on is appropriate lenses (and the best lenses) to use with my Nikon for shooting food. Have you written any posts about this in the past? Or planned for the future?
Thankyou!
I’m entirely new to photography and I love this blog. It has a lot of useful tips… ofcourse the pictures speak for themselves.
Great website. i just purchased capture one pro and the images don’t look as good as far as sharpness compared to the Canon software. i have tried different sharpening but none seems to look as good as the canon software. Tell me I am doing somethig wrong Thanks any advice?
Tamara – yes, Photoshop Raw is quite good, although I like the tools in Capture One a bit better. It also has the one-click auto.
Hi Jackie – I don’t use a Nikon, but the same lenses should apply. Check out the Camera Gear category for my recommendations (although quickly – the 50mm 1.4 is fantastic, and I’d never give up my 100mm 2.8 macro).
Vernon – thanks!
John – Hmm. I haven’t used the Canon software… doesn’t run on my Intel based mac… so hard for me to comment on that. But, there is an adjustment for sharpness in Capture One. It’s just in kind of a wierd place under the eye-glasses (focus) tool. One other thought is where do you see the problem… I have noticed that sometimes the preview isn’t as sharp, but the image itself is fine. Again, if you go to the focus tab, you can see the difference between true 100% and the “faked” 100% in the main preview window. Since there is no pixel editing in Capture One, I think it’s an ok trade off for speed not to show the actual resolution in the main window. You can always check the actual sharpness in the smaller preview.
Does that make sense?
-L
Great blog! You’re very generous with your information. Since reading this I’ve taken up tethered shooting using my 400D, Contax/Zeiss manual focus lenses with extension tubes when necessary and the free Canon utility which works perfectly on Windows. I also have Bridge open at the folder into which I’m downloading the files as I shoot. That means I’m only one click away from all the adjustments I can make in Bridge. Just thought I’d say this in case some people thought the Canon software was no use.
Thanks again, I’m having a ball!
do sombody know how touse tethered shooting with a nikon d70 and lightroom