Sweep & Float
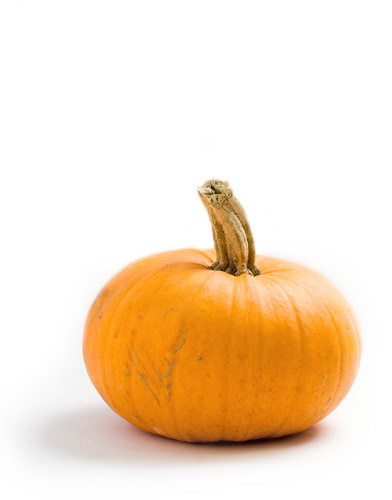
One common technique for still life and product photography is floating the subject on a background, usually a single color and often white or black. These images are then easily placed in catalogs or websites without having a whole square photo look. They seem to simply float on the page. (Somewhat ironically, my floating photo here doesn’t float, since my background isn’t white!)
To achieve the look, you need a simple tool called a sweep. It’s really not even much of a tool… it’s just something that you can hang a piece of paper (or cloth) from so that it has a very gentle curve where it shifts from vertical to horizontal, which “erases” the horizon line you get with a table and a wall. You can make a sweep yourself in about 2 minutes with a good sized cardboard box. Just cut it down so that there are two perpendicular sides that are large enough to meet your needs. Then, you can prop it against books or cans to hold the one side upright, and simply tape the paper along the top.
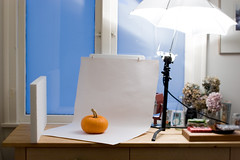
Easy enough to make… but I actually went out and bought one. Why? Well, it’s not just because I seem to get an itch around the holidays to buy stuff when technically my husband and I are on a “buying ban.” It’s because the sweep that I bought has some nice features and came with a whole mess of sweep paper, for a fairly reasonable price. I got the Lowel EGO Sweep, which is a slightly translucent white material. Unlike cardboard, the sweep actually lets a bit of light through the back… just enough to minimize the shadow that can happen on the vertical surface area. When shooting on white, this is particularly helpful as it saves much Photoshop clean up work.

Lowel EGO Sweep Table-top Background Support Stand & Colored Paper Backgrounds
The trick when floating a product on white is that pure white, the one that actually matches #FFFFFF, the background color of most websites, is really hard to get right out of the camera. Shadows creep in where you least expect them… and then when the image appears on real white, you see the edges of the photo and your whole floatiness goes away. When you put white paper that has some translucence to it on a dark surface… you are going to end up with shadows, and your white background is going to be darker than the white highlight on your subject. The Lowel EGO sweep doesn’t completely eliminate this, but it does help.
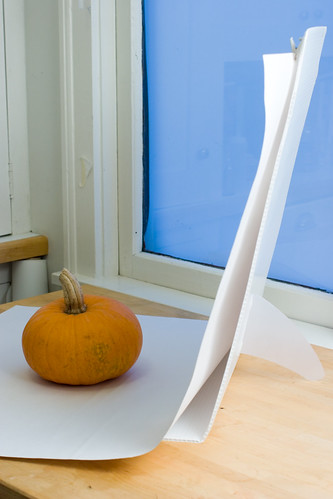
Plus, it has a cute little “tail” on the back, so it stands up by itself and little clips to hang the paper or cloth without using tape. For $30 (US), it’s a good buy.
To get the whites as close to pure white in the camera as possible, I do a couple of things. First, I set my white balance. If you are using the any of the presets on your camera, then you are probably not getting neutral whites. To ensure that you are getting the cleanest white possible, it’s best to shoot a test shot of a white card (I use a piece of photo paper for this) and use it to set your camera’s custom white balance. By doing this, you should be able to get great white balance even in mixed lighting conditions. If you are dealing with natural light, be aware that as the light changes because the sun moves or a cloud goes by, your white balance will change. This is unavoidable and means that there will be some adjustments you’ll have to do after the fact, else you will be constantly shooting a white card and resetting your WB.
The other important step is checking the image histogram, if your camera can display it, to make sure that the exposure is looking good. The far right represents whites, so if there is nothing on that side of the graph, then the whites are coming out as grey. On the flip side, you don’t want too much towards the right or you’ll be blowing out the highlights. (more on exposure here)
Once I’ve taken my shots, and gotten the background as close to pure white in the camera as possible, it’s time for some fine tuning in Photoshop.
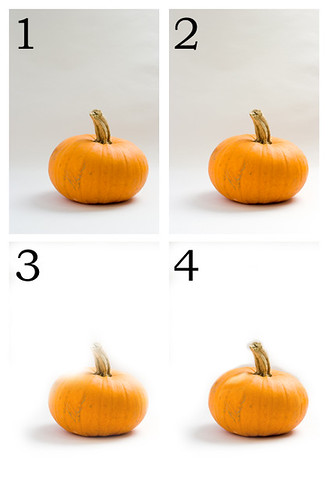
First, I clean up any dust/scratch kind of stuff and get the exposure and color as close to accurate on the main part of the image as I can (#2). I don’t worry about the background white at this point… I just fix the subject.
Then, I create a new layer with a mask. I fill the layer with 100% white (#FFFFFF) and the mask with 100% black (#000000). Filling the mask with black makes the layer 100% transparent, and the original images shows through. Then, painting on the mask, I start slowly paining white around the edges with a fairly large, very soft brush, getting as close to the subject as I can without painting over it (#3). This lets the real white show through. Then I go back and forth painting (#4) with white and black on the mask, using smaller and smaller brushes, until the subject is completely showing from the original image, but the floating area is pure white. The subject’s shadow is always the trickiest part, and will always turn out best if you are close to true white in the camera. If you can’t get the edge completely right, it’s usually better to be a bit to light than have a darker or color casted halo.
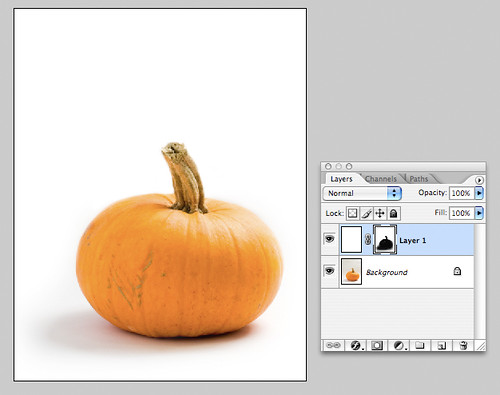
It takes a bit of practice to get the hang of this, but the good news is that since you are working on the mask, it’s easy to make corrections. In the end, you want a subject that is on pure white, but that doesn’t have ugly halos of gray (#4) or blue or yellow around it. The mask should look something like a flat black shape of the image.
I typically keep a TIFF version or a PSD version of the file with the layers preserved in case I need it later. It is quite a bit of work to have to repeat it all!
Technorati Tags: Food, Photography, Tips
Thank you for such a clear explanation – I was curious about how the horizon line was eliminated.
When I saw some of your recent Flickr photos, I was hoping you’d post an article on how to get a perfect white background. These are terrific camera and Photoshop tips–capturing perfect white seems to be my biggest challenge. And perhaps it’s time to invest in a Lowell sweep–I usually prop up set paper with pillows or books, which can be sort of awkward.
Lara – I learned a lot from your posts and tutorials and now feel much better for my photos. I will try Sweep & Float the first time I get a chance. Thanks again!
Huh! This is fascinating. Thank you so much for the advice – I will go forth and try it out.
thanks, this is really useful reading, although I am still not quite sure how to go about getting the shadow right … this is the bit I seem to make a mess of
June – Thanks!
Lisa – White is really tricky. I had a to shoot a full product line of herbs in little plastic cases on white background, and that’s where I figured out how to “fix” them in photoshop… but I didn’t have a particularly good white to begin with. It’s always best if you can use a really clean matte white in the first place… it should leave you with less clean up, but there will always be some. Glad my tips could help!
Cerik – Great! Thanks!
Danielle – Glad to help! Hope it all works for you!
aj – yeah, the shadow is always the trickiest part. I find a really, really soft brush usually does the trick. I set mine all the way to 0% hardness for this kind of work. The feathering let’s me blend the mask in around the shadow very nicely.
I was struggling with a horizon problem the other day…now I know how to get around it..thanks so much for such a clear and detailed explaination
thank you so much for the tutorial.
i have tried it and came up amazingly.
once again, thank you very much for sharing us this tutorial.
What a great tutorial! Thanks so much!
This is a great tutorial. I always wondered how to get that effect. I still don’t think I can do it like you can, though..
amazing Tutorial Dear ..
i can used this idea with other colors back ground like black or red .. ?
Jules – You are welcome! Glad it helped!
Syl – Awesome! It’s amazing how sometimes the most simple things can make such a difference. Thanks for stopping by!
Nicole – Thanks!
David – Well, I’m sure you can with some practice! Not that I’ll ever master chocolate like you…
Orchid – Hi… and yes, you can do this with any color, or even with patterns (although the clean-up afterwards might be harder with an ornate pattern) Thanks!
-L
This is the first time i’ve stumbled on to your blog….and trust me you cant imagine how helpful this has been.I’m a novice in photography having got a EOS 400D with the basic kit lens and a Speedlite 580EX for christmas.Still trying to figure the camera out.Trying to get as much information as i can.Keep wondering why my shots wont come out good and what lens should i buy for food photography….everything a beginner would want to know.I’m definately going to use your tips and buy one of those umbrella thingies…
I’ve put u on my favourites so i’ll be seeing you real often now.Thanks a lot.
Your advice on the clean, white background had me on the edge of my seat until you started creating layers with masks. My photoshop knowledge is limited to cropping, sharpening and correcting basic curves and levels. You lost me on the layers, masks and painting. Can you offer any further explanation of how to create a layer with a mask and how to paint, and then blend, it? If not here, any other tutorials you could recommend?
Thanks in advance.
D.
Kate – I’m sure you must be having fun! Hope the site continues to be helpful for you! My best advice: shoot, shoot, shoot!
Doug – Sorry I lost you along the way. I know that masks and layers can be intimidating, and yes, I’ll try to do a post on them at some point, although given the focus of my blog, it’s not going to be comprehensive, but more of an overview and a few basics. I’d recommend checking out Scott Kelby’s books on Photoshop. He offers up some fantastic tips in a pretty straight forward manner. this one would probably be the best bet for you.
Hope that helps!
-L
Lara,
Thank you for your reply and directed me to this website of yours which I think will help me a lot in the beginning of my journey to food photopgrahy!
Leemei.