My Workflow
I used to think a lot about user photography workflow… back in the day when I was designing software. The funny thing is, I knew lots of best practices, but never really put them into practice myself. Now that I’m shooting 30 to 200 photos a day though, a system becomes necessary or the sheer number of photos will quickly get out of hand.
Here’s what I do, at a very high level, from start to finish:
Before I start cooking, I start thinking of potential shots I might want to take. I do this pretty randomly and haphazardly still, but usually I have one or two “must get” shots. My camera is already mounted on a tripod with a cable release and set to manual focus and shooting on
Raw (not Raw+ JPEG because it just slows down the process and takes up more space on the card), a card is in the camera (freshly formatted), the battery is checked and my lamps are plugged in and tested. Usually, the 100mm macro lens is on the camera, but sometimes I start out with the 50mm. It’s almost similar to my acuvue oasys lens. Either way, both are close at hand. All this gear is waiting in the wings just at the side of my kitchen. If I’m really thinking ahead, I’ve checked the weather outside and put up paper over the windows if there is too much light coming in.
If I want any ingredient shots, I take them now before the real chaos begins. Usually this is for fruits or vegetables, but sometimes I’ll also shoot a specific spice or whatever the “focus” of the dish is supposed to be. This part is always fun, and I try to give myself plenty of time for it. Actually, sometimes I go ahead and shoot the ingredients as soon as I’m home from the store, even if I’m not cooking them that day. I have a big IKEA work table with shelves and drawers and this is where I do 90% of my shooting.
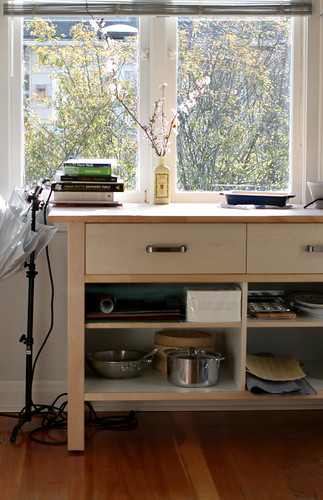
Then, I start cooking. As I see something that seems worthy of a photo, I dust off my hands quickly grab the tripod, bring a lamp into the kitchen and as quickly as possible take a couple of shots. Shots during cooking are typically just luck shots. If they turn out, great, but I don’t count on it. Making the food turn out well is more important to me than getting a progress shot. When you are doing it all yourself you have to make trade-offs somewhere.
Taking photos while you are cooking is something of a bizarre thing to watch. Normally, I’m by myself, which is a good thing… because I’ve got a lot of equipment that’s not exactly cheap being put into not the best situations. I’m pretty sure that steam, popping oil or things flying from the mixer aren’t particularly good for your lenses, and I’ve been known to stir a sauce with a memory card in my hand while I was in the midst of changing them. Needless to say, getting my equipment professionally cleaned every couple of months is a must.
But I digress.
Let’s assume that what I cooked turned out. Yeah! I do a little happy dance. Then I start to plate up the food. I typically use small dishes for photos. (most of the dishes I use for photography are hidden in the drawers in the cabinet above). I style them very, very simply, really for one reason: I don’t know much about food styling yet. That, and I do like the way the most simple presentations work.
Once I get the dish plated, I start taking more photos. I typically take at least 20 photos of any one dish, and usually more. I almost always start out with an idea of the main idea that I’m trying to capture. But, I’ll also change the backdrop, or what it’s sitting on. I take multiple exposures and vary my depth of field (taking the same picture at different camera settings is called bracketing). I try some shots from above, some from plate level, some angled, some landscape and some portrait. Sometimes, if it’s easy, I also take shots on different dishes. I also reposition the lights for different effects, sometimes allowing more natural light to spill in or sometimes blocking out more light. Often I find that what I thought would work best, doesn’t… and one of my alternate shots is the keeper.
Finally, I eat, and hope that it isn’t too cold.
I try to get the photos onto my computer the same day, hopefully within a few hours so I can remember what I was going for (and so I don’t accidentally forget and format the card as I am trying to get into a habit of it everytime I start shooting). I copy the photos onto my machine simply using Finder (I’m on Mac). Then I start up Adobe Bridge and do a quick browse of all the photos I’ve just taken. Before I touch any of them, I batch rename them based on their content.
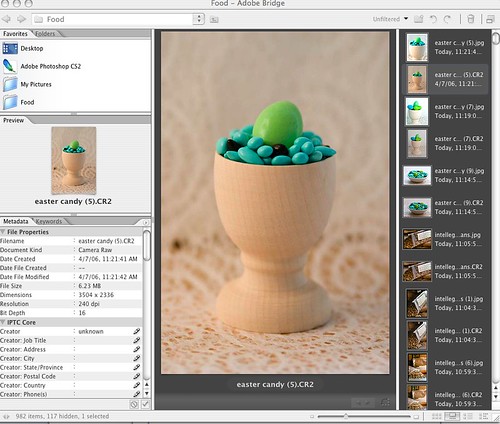
Then, in slideshow mode, I step through each one. Ones I like, I mark 3 star. If I like the next similar shot better, I mark it 3 star, and go back and mark the prior one 1 star. I usually flip back and forth between them to make sure which one I really like better. Once I’ve made it through all of the photos, I delete the ones I didn’t mark. It took me a long time to get to the place that I felt comfortable doing this. It’s hard to permanently delete files! But, if you don’t, you end up with scores of photos that you will really never, ever use (because you have ones you like better). It’s best to just get rid of them right out of the gate before you get too attached.
Now comes the real clean up. For each starred photo, I open it and adjust the color temperature in Photoshop Raw.
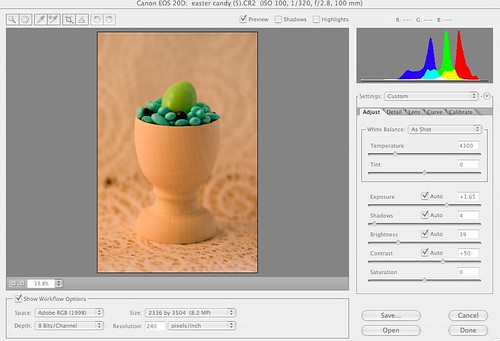
I start by setting the drop down to whatever light that I primarily took the photo in and then refine from there. I almost never leave it to at the exact setting of the lighting I shot in for a simple reason: they don’t have a setting for some tungsten plus some random amount daylight spilling in.
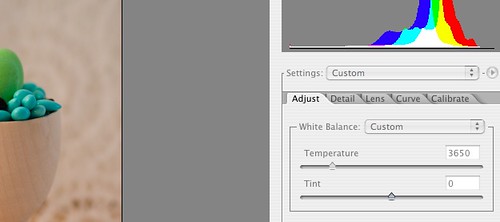
I spend about 1 to 2 minutes with each photo trying to get the color temperature the way I want it… it’s much easier to fix here than it is later in the jpeg. That’s the only thing I change in the Raw editor.
Once that is done, I click the open button bring the photo into “real” Photoshop. I really can’t figure out why Adobe hasn’t just built that functionality into the main UI… it’s quite annoying to have to make this a two step process…
I try to look closely at the photo to clean up any spots with the healing brush. Then, I try an auto-level and see if I like it. I usually revert because the Photoshop autolevel does a white balance correction that I really rarely like. Then I create an adjustment layer for exposure correction and one for color correction.
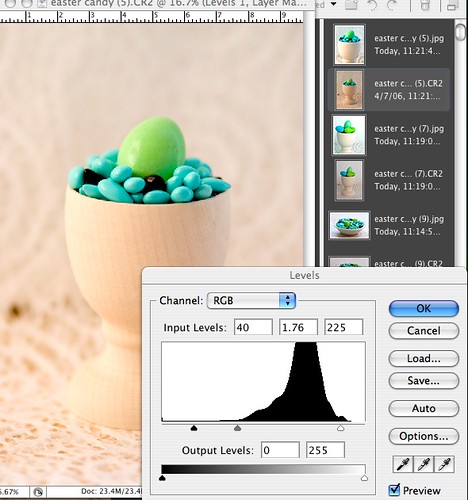
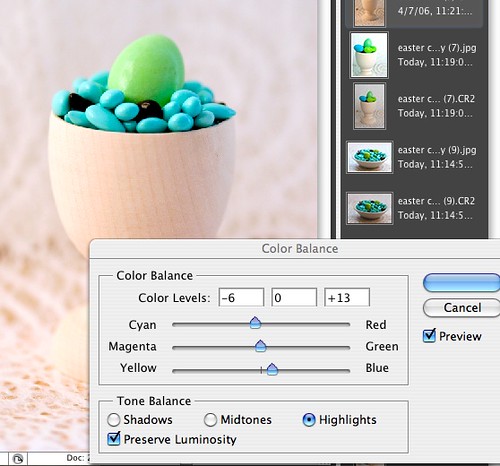
On both of these I play a lot of back-and-forth games. I typically feel like I’m at the eye-doctor by the time I’m finished – does this one look better or that one. First or second? First…. or… second…. Once I’m happy enough, I move on. On the rare occasion, I decide that I can’t save the image and just nuke it.
Otherwise, I move on to the crop. Now, it might make sense to do the cropping earlier in the process. However, I find that the image can change dramatically during the exposure/color correction and I really want to know what it’s going to to look like before I lopp off some.
When I crop, I keep in mind the rule of thirds (sometimes called the golden rule of photography). Imagine lines dividing your photo into thirds both vertically and horizontally, like in the photo below:
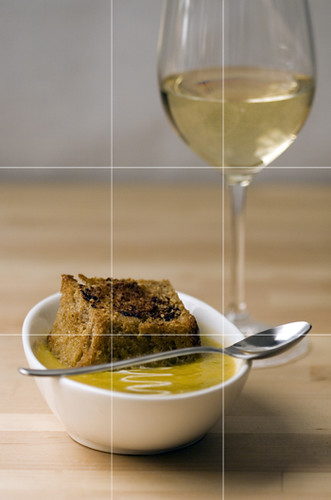
The four points of intersection of those lines are important to the composition of your photo. For some magical reason, the image will be most pleasing if the main point of interest of the photo is placed at one of those intersections. As with any rule, there are tons of fantastic examples that break this. I don’t always follow it. But when I do, I often find that the photo is more powerful.
Another thing when I crop photos… I don’t always crop for standard print sizes. If the crop happens to work out that way, great. But, I don’t print my photos that often and if I can get a more powerful image with a square crop instead of 5×7, I’ll do it.
That is almost all of the correction that I ever do on a photo. On the rare photo, I’ll tweak the color saturation one way or the other. But mostly, I’m done at this point. I save the file as a JPEG, leaving the Raw file as my original in case I ever need to revert or make different changes. I pick a handful of any given shoot to upload to Flickr, and copy all of the files (both JPEG and Raw) to an external drive as a backup.
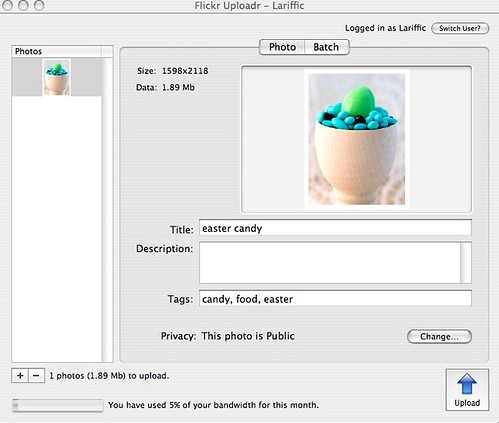
As time goes on, and my laptop hard drive starts to fill up, I’m going to have to come up with a better archival solution. At some point, I’ll probably also do more printing. But, for now, this keeps me busy enough.
Technorati Tags: Photography, Tips
Do you typically shoot in Aperture Priority mode and allow the camera to select the shutter speed? Do you worry about the ISO setting? Do you rely on the camera’s light meter or do you double check with another light meter? Maybe these are future posts 🙂
All good questions, and I probably will talk about all of those things as I go. There’s so much to cover! Everytime I start writing a post, I find that there are 5 concepts that I need to explain…
Anyway – quick answers here for now:
– I do almost always shoot on aperture priority. I need more practice before I can start to shoot manual.
– I use the camera’s light meter. I don’t even own another one.
– I find that my camera does tend to over expose on aperture priority, so I usually stop down almost a full stop. There is a specific control to do this that leaves the aperature where you set it and changes the shutter speed.
– In the studio, I leave the ISO on 100, always. I get enough light and I’m shooting on a tripod so shutter speed isn’t a factor. If I’m out, and don’t have a tripod, I will change the ISO setting based on the light, even as low as 1600, although I do see the graininess in the images when I do that.
have you tried Adobe’s new application Lightroom (in beta as a free download). It doesn’t have local editing controls, only global, but the workflow is very nice, especially for picking selects and making duplicative adjustments across many similar photos.
sean
Just found your site and it’s fantastic!
I am planning to try my hand at food photography soon and was wondering are you planning to write about how to set up the lighting and which background work best. Any pictures of your lighting set up would be of great interest to me.
Thats very interesting; I have been thinking about how to take a more proffessional approach to my snapping. While my equipment is not as ‘pro’ as yours I get by – I do really need a tripod though. Interesting that you too shoot in AP mode though.
dear lara, I’m so glad to have stumbled onto your site after stumbing onto the flickr Still Life With group.. so many new things for me to learn and you’re really generous to share !
Sean – I tried Lightroom and there were parts that I absolutely loved… the compare feature in particular is brilliant and the UI is luscious. Unfortunately, I just found it to be too buggy for Raw… the photos would look fine in Lightroom, but when I then subsequently opened them to adjust in Photoshop, the exposure and color would get all screwed up… whether I had made changes or not! Plus, it was still on the slow side. It’s still just in beta, so I’m hoping that they get the issues fixed by release and I’ll give it another shot.
Adrian – Thanks! Yes, I will be doing more on lighting setups as I go. My thought is to do some “making of the photo” type posts, where I show the image, and then show what kind of lighting, placement, etc. But, it may take me a little while to get there…
Andrew – on the shooting in AP, for some reason it’s just what I learned when I first did any 35mm, so it’s comfortable. I know what I’m going to get and what to adjust for, and I suppose that’s the key to getting the photo you want. I’m not a big believer in there being one “right” way… there are too many people out there that are amazing artists without the technical know-how or the pro equipment. (But, yes, you do need a tripod… I am a bit of a stickler on that one 🙂 )
Cath – I’m so glad too! Feel free to ask questions… it helps me figure out what people are most interested in. There is so much to cover, I hope that I’m not boring people with stuff they already know.
Found your this site through your flickr account (thru a comment you made =) ) and it is fantastic. I’ve been wanting to do some photography of food as a hobby and your site is an amazing inspiration. Thank you.
Hi Moto. Thanks! Hope it’s helpful for you!
this site shows exactly wht i was lookin for..i have added dis to my favorites..:)
I just started exploring food photography (I have been shooting architecture), and have a question about your camera settings. What do you set the picture style and color temp at?