Lighting Positioning: Shooting in the Kitchen

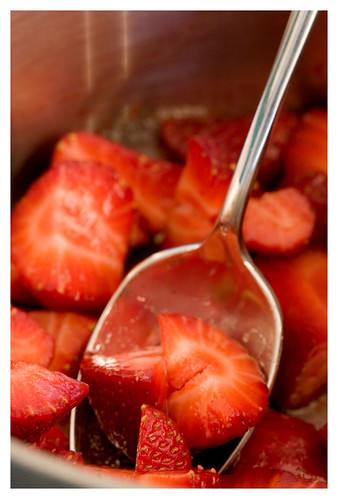
I think that one of the most common questions I get is how do I position my lights to get my food shots. There are simple answers, but they aren’t complete because different moods call for different lighting, and different situations only allow for so much futzing with lamps. In particular, when you are in the kitchen, you have to figure out the right light for the job… just going with natural light (simple!) or bringing in some additional lighting help. This basic shot of strawberries that I was prepping for a dessert shows the difference between lighting conditions:
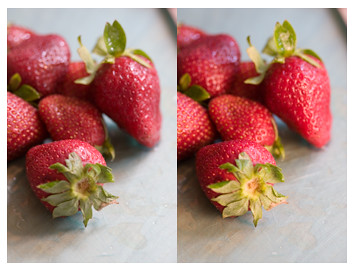
The image on the left has no added light, just a little bit of natural daylight coming in through the window behind them on a very cloudy Seattle day. The image on the left (as well as the first image in this article) is lit with a single, diffuse studio light. Neither has been retouched except for the auto-white balance correction in the camera. Because I shoot with a tripod, both shots are clean and clear and the differences are subtle. The studio light image “fixes” some of the shadows that are in the natural light version and it’s a bit warmer. They are both good, usable shots. In this case, I prefer the studio light version… it just looks juicier to me.
To recreate that version, you’ll need to be shooting with some natural light and a basic lighting kit, that is, a couple of well powered lights with some way to diffuse the light. This could be something like the Lowel Tota-brella, or a softbox, or simply a sheer material placed between the light and the food. They all work, but you’ll get better, more even, diffusion with the first two than the third. For the natural light, you want daylight. If you are shooting at night, this technique won’t work as well and you’ll need some kind of additional light source (preferably another good studio light, instead of your kitchen overhead lighting), or you’ll end up with areas that are underexposed.
Place the natural light (ie, window) behind the scene if at all possible. If you can’t, don’t worry too much… you are mainly getting the ambient light anyway. If it’s really bright out and the light is streaming in, you’ll need to cover the window with something sheer, to soften the light.
Place one studio light, with the diffuser, to the side and above the food. You can put it a bit in back or a bit in front, depending on how the subject is placed. For “in progress” food shots, I use one light because its easy to move in and out of the kitchen as I’m working and I don’t get too tangled up in cables like I would if I had multiple lights going. It should look something like this:
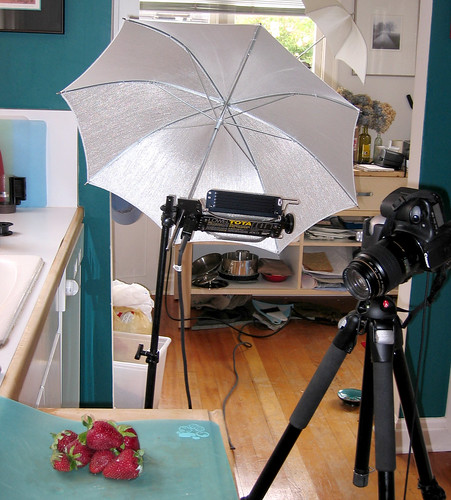
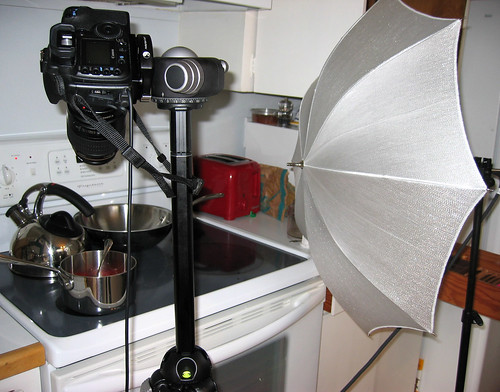
Notice that the light actually faces away from the subject, and the umbrella bounces the light back onto the subject, giving very nice soft light. Some diffusers (even umbrellas) are meant to work the other way… the light goes through them rather than being reflected. In that case, you’d set up like this (except, I’d probably try to get the light a bit higher and pointing more down into the pot):
When I’m shooting my final, finished dish, I do get a bit fancier. I typically work with two Tota lights, and place one of the lights (with the diffuser) a bit further back and above the food. I place the other, closer, directly to the side. I will also use a Disc Reflector (you can cover a sheet of cardboard with aluminum foil for a cheap one of these) to cast a bit of light onto the front to prevent it from being underexposed. This really only adds a tiny bit of light, but can really open up any shadows that may be forming. You can use these in the kitchen as well, but it’ll be tricky unless you have a really, really big space to work with. I’ll talk more about using multiple lights, including introducing a spot light in my next lighting post.
I’d encourage you to play around with different light positions, and write down what you did in a notebook to look back and compare with the results. Start with this basic table-top lighting scheme, and adjust to find your own style from there.
Technorati Tags: camera gear, Food, Photography, Tips
I am one who has asked in the past on how you do your lighting. This tutorial was great and gave me the visual I needed 🙂
I have bookmarked this and will look at it again for future reference when I get some lighting equiptment. Thank you for the easy and fun tuturial. 🙂
I love your blog and the idea for it – it makes complete sense! the world needs a (beautfiul) food photography blog. I will be adding your link to my site. And checking back often…Thanks!
Girl, I am saving my pennies to get some kick-butt lighting. Just today, I got rid of a useless couch in our ante-room. A room, which by all counts, serves no purpose.
Yet it sits right next to the kicthen. Possibly waiting to be filled with tables, lighting equipment, and props. Hey, my husband has his garage filled with Ducatis, right? 😉
Stumbled across ur great blog! I am also a sucker for good food photography. I started a recipe blog recently and found out that I love taking food photos as much as I love cooking. I foresee I shall be learning a great deal from you. Thanks!
Hi there,
Just came across your blog for the first time today. I didn’t even realize there were people blogging about food photography, so I’m happy to have found you and your links!
I’m a (mostly food) photographer based in Bangkok, Thailand. I’ve got a blog on Thai food, RealThai (http://realthai.blogspot.com/), as well as an online portfolio (www.austinbushphotography.com). And I’m sure I’ll coming back here from time to time…
Cheers,
Austin
Thanks all for all the comments! And welcome all you new folks!
Jack – Glad this helped! I’ll keep them coming.
Kathya & S’kat – keep in mind there is lots of lighting you can use that is fairly inexpensive, will make a nice difference in your photography, and you can start to learn the basic principles of “painting with light.” When I started about 6 months ago, I was using a simple desk lamp, reflected against a white wall or sheet. A work lamp from a hardware store will work even better, and cost well under $100.
Austin – I am a bit jealous of you getting to be in Thailand for your food photography! Don’t get me wrong… Seattle is great… but we were supposed to go to Thailand for a bit of a vacation, and didn’t make it this year. Hopefully next! You have some great photos!
Honestly I’m a bit jealous of you–I’m from near Portland, Oregon, and haven’t made it home in almost two years now! I’ve heard wonderful things about the Portland Farmers’ Market, and would love to get a chance to photograph that.
You really should try to make it out here, Thailand is an amazing food destination.
Austin
You’ve got a great site here. I just started food blogging and have quickly come to appreciate fine food photography – it’s a lot more difficult than I thought to capture the essence of food in a one dimensional way. I look forward to learning lots from your site!
Nice shots. I’m no photography expert, but I love food… Both cooking it and eating it! I do a few shots of food sometimes, but I’ve never been able to make them look decent. Now I’ve read a bit about lighting, I might give it another try. Good stuff.