Plating & Presentation Class: Session 3

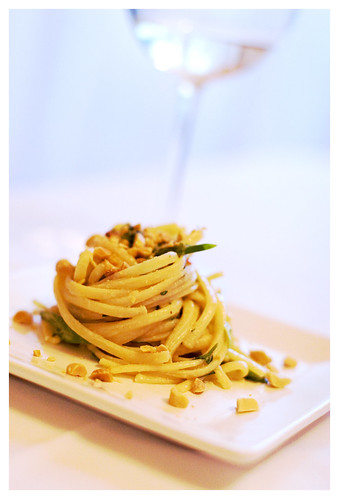
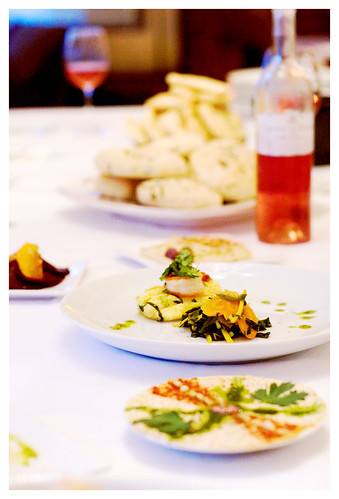
Last week’s session of food presentation was delicious and beautiful, but a little less focused on presentation than the previous two classes. We split up to work on our own dishes… mine the Sesame Tahini Noodle salad pictured above, others made beautiful little breads for dipping into some amazing hummus with herb-infused oils, an amazing halibut filet poached in a curry and sherry broth, a savory phyllo strudel, and then some quick little beet salads.
I’ll post the sesame noodle salad recipe over on Cookbook 411, but here are some of the quick tips we learned along the way:
- To get gorgeous swirls of pasta, hold the pasta with tongs and slowly lower on the plate… rotating the plate as you lower. Then, just tuck in any loose ends. This takes some coordination, but is much easier than spinning the pasta.
- To add more visual interest to chopped vegetables, cut them on a bias… that is diagonally into longer, thin pieces instead of rounds. They’ll have a much more interesting shape, and show off their natural color variations.
- On occasion, try a deconstructed plating. Simply separate the different components of the dish. In our case, we tried this with the halibut in broth… we strained some of the vegetables from the broth (and used a towel to remove excess moisture to prevent “leakage”), staking them on one side of the plate and the halibut on the other. Then a small amout of broth was drizzled over the provide a bit of moisture and color. Of course, constructed was delicious too and let you enjoy more of the broth.
More photos from session 3 are here.
A quick note on the photos from this session… Light was very low, so I ended up shooting at about 1600 ISO. Needless to say, the photos weren’t great. However, I had some fun in Photoshop with these and discovered a new adjustment trick that I quite liked… you simply make a duplicate layer of the main photo, and then use the Color Dodge layer type and adjust the opacity down to about 40%. You’ll end up with very stylized photos that look like they were pushed… whites will blow out but colors will get richer. Now, you may or may not like this look for your own photos, but it’s something you’ll see quite often in food magazines… and I kind of like it of a change (and I like it much better than the original look of the photos which were all yellow and dead looking).
Tonight’s class is on sugars! So look for some fantastic spun sugars and chocolates next week.
Technorati Tags: Food, Food Styling, Photography
I may fly over 90% of recipe posts but I’m truly drawn into yours even though I am NOT allowing myself to focus (no pun intended) on styling and photography. I can only imagine how helpful you are to those who want to learn and improve. (For the record, I do too. But I’m limiting myself so that they don’t become the next obsession!)
I really like the light in the first one…what was the background and did you have to tweak it a lot? Your posts are always super informative and useful – thanks for sharing!
Lovely post L! Nad do I need to add superb pictures? Now I need a taste…..
Hi L,
I’ve been following your blog for a while now, and wanted to let you know that I’ve found it to be really informative, and your pictures are always so impressive! Your blog has really inspired me to play around with photography. I’m actually getting a digital camera shortly (manual control, second-hand-but-new-to-me), and I can’t wait to try out some of the stuff that I’ve read here. Maybe I’ll even get a chance to enter a pic or two in your June challenge!
Thanks again for the great tips and inspiration!
Your site provides me with great tips that I try to keep in mind when preparing food that I will post about on my blog. Thank you so much for sharing!
Great tip – shooting at those speeds is such a pain! I’ve never used that technique before, but I’ll definitely give it a try, as I love the effect it gives. Fantastic shots!