Some changes going on around here…

I think you all know how big of a fan of Capture One I am. I’ve been using it for a few years, and it makes tethered and remote capture super simple whether it’s batch applying settings or making it braindead simple to convert images from Raw to a whole set of other formats. I usually output TIFF, 2 versions of JPEGs and sometimes thumbnails. Click, click, click, it’s done and I almost never go into Photoshop for editing.
All that came to a screeching halt recently with the addition of a new iMac to my studio and the soon-to-be upgrade to Leopard. It turns out, Capture One Pro won’t work tethered with Canons (not sure about Nikons) on Leopard. I just want to note for the record, that Vista isn’t the only OS with problems on upgrading, even if they don’t have silly cool ads pointing fingers. Leopard is NOT all puppies and sunshine. But, anyway, that’s besides the point.
The real point is that between the lack of Leopard support along with the changes to Capture One 4, it seems I was going to need to be finding some new software. I had already been intent on trying a few new apps… something to manage my ever growing library of images. I’m starting to do some stock photography work with one (and maybe two) of the big rights managed agencies (Stockfood right now, and Jupiter Images’ FoodPix as soon as I can get my act together) and so having a great way to keep track of what I’ve submitted to who is going to be critical.
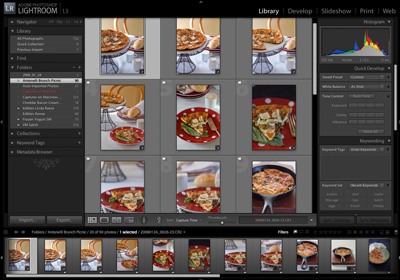
There are lots of apps that help you organize a large collection of photos, but I’m pretty picky when it comes to this sort of thing. When I was at Microsoft, we designed a product (Digital Image Library which influenced the design of the Vista photos functionality) to do this, and I’ve spent months thinking about the ideal way that I like to manage my images. Unfortunately, that product is aimed at people with far fewer photos than I have and it doesn’t really scale to the degree I need it to. After giving a few apps a shot, including iView Media Pro (now Microsoft Expression Media), Aperture and Adobe Lightroom, I think I’ve settled on one. And surprise! It’s Lightroom. The app I much disliked when I tested it in beta many months ago.
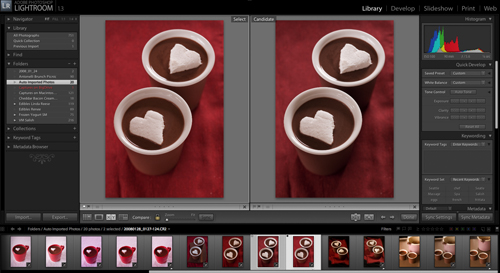
At that point, Lightroom was pretty, but unworkably slow. I also found that the Raw editing capabilities ended up leaving me with some very weird looking images… they’d look fine in Lightroom, but the exported files looked horrible. The final released version seems to have none of these problems. It’s quite zippy (of course, that may be in part my shiny new machine), and it solves more problems than I even needed it too. It’s my new tethered shooting solution (although to be fair, it takes quite a few hacks to make this work as it isn’t natively supported), and I quickly move from a series of shots to finished images all in the same app. My favorite feature, and one that Capture One was missing, is the ability to compare a few separate images side by side to help you pick exactly the right one. There is also a great before/after edits feature.
If you are going to start using Lightroom (there is a 30 day free trial, so you can give it a go), there are a couple of hacks I recommend giving a try.
First off, to shoot tethered you need to make sure you install the software that came with your camera. You’ll actually be using that to do the communication with the camera. Setup that software to copy the captured photos to a specific folder. Then, you’ll need to set Lightroom to automatically import from that folder (File->Auto Import). I have mine set to move the photos out of the capture folder into a folder called Auto Imported Photos (this is the default). Once you have that setup, and turned on (there is a toggle in the same menu), you can start shooting and the images will automatically start appearing. There are some downsides. First off, the most recent images isn’t already selected, so it doesn’t just come up on screen as you shoot. Boo. I seriously miss this feature in Capture One. Another missing feature? It doesn’t automatically apply the settings from the last image. It’s easy to do with just two clicks… in the develop frame, there is a button for Previous. But, one of the drawbacks of not actually having Lightroom support true tethered shooting is that you will have a few work arounds. On the plus side, the Auto Import settings do let you apply metadata automatically, which makes sure that you get your copyright data in each file… something I find myself often forgetting to do. You can also apply a set of keywords as you import. Neat.
The next hack is to make up for another great Capture One feature… the ability to add a customizable watermark on export. Lightroom does actually have a watermark on export functionality, but you can’t change the font or font size, and I found it too large for the photos that I want to post to my website. No worries, this one is a pretty easy one to solve using Photoshop actions. First of all, go to Lightroom Extra and download the Copyright watermark script found under Downloads->Other Goodies. Follow the instructions in the readme for installing the script into Photoshop. Then, you’ll need to create your own action. This is a little tricky… but once the script is installed, you start to record a new action and then select the script in File->Scripts (it’s called kw_addCopyright). Next, I add a color profile conversion… switching the image to Generic RGB which is helps my images look the same across web browsers. You don’t have to do this, but if you are posting your photos to the web, I recommend it and this is as good of place to do it as anything. Then, finish up your action with a save. Next, you’ll need to create a droplet (File->Automate->Create Droplet), pick the action you just created, and tell it to save & close. Now, you’ll need to find your Lightroom Export Actions folder. On Mac, it’s probably under Library->Application Support->LightRoom. Put the new action there. Now, it will appear in the Export dialog box Post Processing drop-down (if you don’t see a drop-down there, you may need to scroll your window. It took me forever to realize that the window had a scroll bar…). Select that, and then when you export, the images will automatically run Photoshop and put whatever copyright text you had in your EXIF data in a nice, clean way.
OK… I know that wasn’t exactly simple… but hang with me, I’m not quite done yet. Now you’ll have your image watermarked, but how do you change the font size? You’ll have to go back to that script you installed for that, and change it there. This means its not exactly easy to change for different images, but most of the time my guess is that you won’t have to do that. If you do, just make a copy of the script and a new action using the alternate script. Changing the font in the script is pretty simple though. You just need to open it in a text editor (or double click in Finder on Mac and it will open up in the built in script editor). It looks like this:
// PARAMETERS YOU CAN ADJUST //
var AUTO_SAVE = false; // AUTOMATICALLY FLATTEN AND SAVE
// DISABLED BY DEFAULT
var BOTTOM_OFFSET = 10; // PIXEL OFFSET FROM BOTTOM
var RIGHT_OFFSET = 10; // PIXEL OFFSET FROM RIGHT
var FONT = “Gotham-Medium”; // FONT NAME (SYSTEM ID, IE “Arial”)
var SIZE = 3; // FONT SIZE IN PIXELS
var FRONT_OPACITY = 50; // OPACITY OF WHITE TOP LAYER
var SHADOW_OPACITY = 30; // OPACITY OF BLACK BOTTOM LAYER
var SHADOW_OFFSET = 1; // PIXEL OFFSET OF BOTTOM LAYER
var EMBED_PROFILE = true; // EMBED COLOR PROFILE IN JPEG ‚ TRUE/FALSE
var JPEG_QUALITY = 10;
I’m sure I’ll find others along the way. If you are already using Lightroom and have any hints, please feel free to share them in the comments!
Just this past weekend I went through the same process that you just described. I found that in Lightroom, if you are in the Library module (but viewing one full size image, ie, not grid), when the next image hits the watched folder, it will automatically come up on the screen full size.
Also, I tend to create a develop preset from the first image that’s shot from a shoot, and then have it applied to any image that’s brought in from then on. This can be set up in the auto import settings.
Good luck!
Thanks for the info. I have a question, though. I tried Lightroom for a minute or two, but had issues with the color profile — I simply couldn’t find a way to set the one that I preferred. From what I understand, Lightroom uses the ProPhoto RGB color space, which I believe has the biggest gamut of all. This is all fine as long as I don’t export to Photoshop and the images are opened with sRGB which has a much smaller range. See my problem? Besides this, Lightroom is very slick and the interface is so pretty.
This is super duper amazing to hear ~ thank you so much for posting it! I’ve been using LR since Beta, and I love it for processing my raw photos, but shooting tethered was my biggest complaint. So fuuny, I was planning to buy Capture and everything needed, but I’m so glad I didn’t, and saved myself the Leopard-induced headache (and it would be the third Leopard-induced headache I’ve had…puppies and sunshine is sure ain’t).
Thanks for the information! I am curious – why don’t you use Bridge for photo management? I have a very basic system in place which is using Nikon’s basic and inexpensive Camera Control Pro for tethered shooting and Bridge for management (since it comes along with Photoshop anyway) – curious if what I’m missing would be over my head anyway or if I’m really missing out?
Thank you for sharing this useful information. Managing photos is for me the most tedious part of practicing photography,yet it’s a task that needs to be dealt with sooner rather than later…
Brian – Cool but odd… I shoot in library mode and mine doesn’t automatically advance. I’ll have to play around some more to see if I can figure out the switch.
Christina – I’ll have to take a look. I haven’t noticed it being a problem, and assumed it just used the color profile from the camera. I export to sRGB or AdobeRGB depending on the specific needs and haven’t noticed much degradation (although there always will be some with any conversion).
Jackie – Glad I could help. I’m definitely pleased with the new flow, although I will say that I do miss a few Capture One things. Not enough to change, but enough that I’m a bit wistful when I’m shooting. The capture one overlay functionality was fantastic for shooting for very tight layouts like covers.
Sabra – Bridge is fine for most things, but I really like to have views into my photos that aren’t just flat folder structures. I’m using the collections to manage what files I use for what client or stockhouse, for example. And, being able to go through all 20,000 of my photos from the last year in a single view while sounds horrifying is actually pretty clean in Lightroom where it never would have been in Bridge.
Absolutely Morsels of Memory. Glad to help!
hi L,
thanks for your comment reply!
2 questions for you:
(1) how do I get my photo biz website listed on your blog as so many are down the right hand side
and (2) have you figured out in Lightroom how to keep copies of the photos that get moved to a secondary hard-drive? I’ve been in the system of moving the projects I’ve completed onto my back-up hard drive from my macbook when completed, but then LR shows that grey question mark over the corner of the photo until I plug my hard-drive back in again. The only solution I’ve found is to keep low-res jpg copies of all my photos on my macbook so LR can still read them.
Phew.. I finally found your blog again. Lost the link and now I’m glad to have found it again.
If you select the first image and put it in Loupe view, Lightroom will auto update to the new one when it gets in.
As suggested, create a Develop Preset from the first image, and go back to Auto Import Settings.. and select it. That’ll save all the Previous clicks.
As for the question above: Move the photos in Lightroom and Lightroom will track them. I’d suggest moving them back to the drive and then moving them inside Lightrooms Folder Pane.
Hi Jackie,
I have a redesign of this site coming hopefully sometime soon (where soon is in the next couple of months). I hope to come up with a better solution for the list of photographers… but in the meantime, I’ll go ahead and add you.
As to your second question… I have a catalog that includes my external drive… so I just copy the folders I’m done with over. Then, I just select that part of the catalog when I need to get to the older files. It seems to work pretty well with the external drives.
Sean – I think the problem I’m running into is that I tend to move into Develop mode while I’m still shooting, and tweak things as I go along. When I switch back to Library mode, it no longer auto-advances. Good idea on the preset.
Not sure if this is useful anymore but I have been meaning to implement this for a long time (I added lightroom to my workflow and the watermark is certainly irksome).
Instead of downloading the example watermark I went straight to creating my own using this tutorial: http://av.adobe.com/russellbrown/BrandingSM.mov (I used this to create a photoshop watermark action before but went through it again to tweak it for lightroom)
The changes I made were to make my watermark appear about 1/3 down the page, centered vs. on the side (skipping a few steps mid-way through), then I added flattening the image at the end and converting to sRGB.
I then jumped back to your instructions in creating the droplet and putting in the appropriate lightroom directory.
Everything seems to be working great except for the fact that I work in Adobe RGB in Photoshop, not sRGB so I get that color space warning message when Lightroom goes through its export (telling me the workspace and file are in different color spaces). How did you get around that or do you have your warnings turned off?
Hope the link helps – I’ve found it to be the clearest watermark tutorial out there (albeit a tad annoying!).