Bounce Basics

One of the simplest ways to improve your food photography is by controlling the lighting with a reflective surface called a bounce. A bounce can be any white, silver or gold material that reflects light. While the effects may be tricky to see on first glance, they will make a big difference in the overall look of your photos especially when you are using limited natural light that is coming in through a kitchen or dining room window. You can use a bounce in a number of ways.. to subtly lighten shadows, to bring out detail in a dark part of your subject, or even to control reflections. The key is understanding which type of bounce to use and where to put it.
Bounces come in a variety of shades of white, silver and gold. White or silver bounces will reflect the light back onto the subject without changing the light’s color, and I find that’s generally what I want for food photography. Silver bounces are subtly different than white in the quality of the light, slightly increasing the lighting contrast. A white bounce will help maintain a smooth, soft light.
Gold reflectors, on the other hand, change the color slightly, imparting more warm tones (yellows and reds). If you are already shooting in natural light or with Tungsten studio lights, it’s likely your image will be fairly warm already.
While most of the time, you’ll be looking at ways to add light, there are times when there is actually too much light getting reflected back onto your subject. This is when you need a negative fill which absorbs light coming toward it rather than reflecting it back on the subject. A simple piece of matte black poster board works well, and is very inexpensive at your local art supply store.
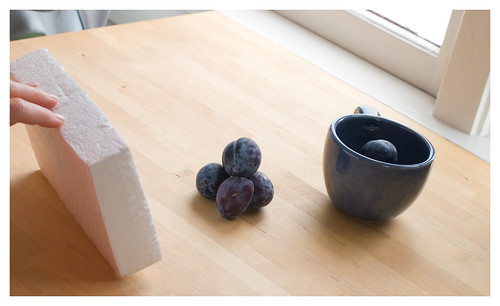
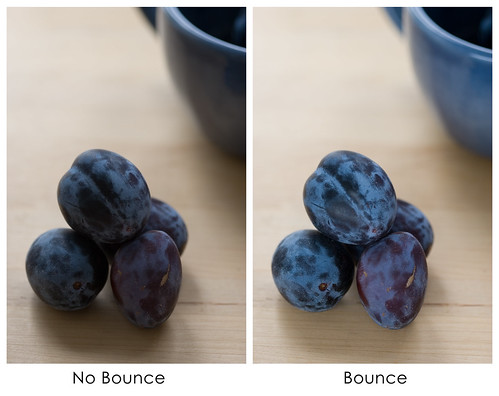
One of my favorite bounces to use is styrofoam… it’s free and if you spill something on it, you really don’t care. I rescued 3 1′ x 4′ pieces of white 1 inch thick foam board from some speaker boxes we were throwing out. They are big and thick enough that I can prop them between my camera tripod and the table that I’m shooting and get some really nice, diffuse light to open up parts of the image. I also have a couple of small styrofoam blocks that came out of some other shipping container. These are only 4″ x 6″, but almost 2″ thick, so they stand up really well and are easily positioned around any subject. For example, I was shooting some Italian plums this week with a lot of diffused backlighting. The plums were a gorgeous blue color, but fairly dark overall. I positioned the bounce between the camera and the subject, just out of view but as close to the plums as I could get.
The light from the window behind them was very lightly reflected onto the front of the plums bringing out their color and texture. The only difference between these two photos is the bounce.
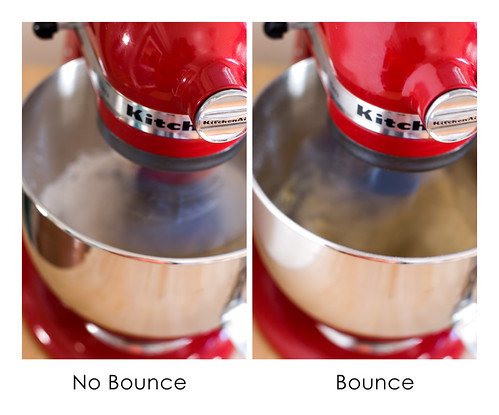
Another important function of the a bounce is reflection control. If you are shooting a reflective surface, you are likely to end up with a lot of noise in the reflections. I was shooting some photos of my Kitchen Aid mixer the other day, and noticed that if I looked carefully, I could see the picture that was hanging on the wall in back of me in the surface of the mixer. Worse, there was a big dark “spot” on the mixing bowl that I found distracting to the overall image. By holding a bounce to the left of the mixer, those reflections became solid white, and looked more like reflected light than something that shouldn’t be there.
I also have a couple of collapsible disc reflectors in a sheer white fabric. They can function as bounces or as diffusers if placed between the subject and a light source, and because they are collapsible, they are easier to carry around with you than a big 1′ x 4′ piece of foam board.

These bounces also have more cool gear associated with them… grips and stands to let you position them without having to grow a yet another arm. Of course, you’ll have to have room for all those bounces and stands to fit around your camera and table and other props. But don’t think you have to go down this path to be professional… you can get amazing results with the cheaper (or free) materials once you get the hang of it.
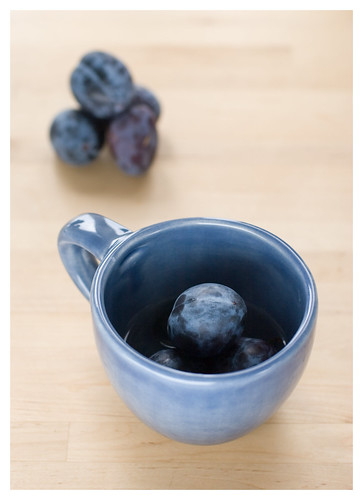
PS: If you are wondering why I was shooting plums in a cup, I’m in the process of making my own sourdough starter from wild yeast… the white stuff on the plums contains a lot of it, so I soaked them in the water I used to make the starter. I should have a Cookbook 411 post on it in the next few weeks if it turns out!
Technorati Tags: Food, Photography
I can’t tell you how wonderfully informative this post was! Thank you! The with/without pictures are great. I knew about “bounce” but thought it was just something professional photographers use.
Can’t wait for the next tutorial!
Thank you — this is really useful to me. I think I use bounces that are too shiny and reflective. The Styrofoam idea is great — lord knows there is always enough of the stuff floating around. How nice to have a use for it.
I can’t believe I didn’t know about this site until now! Thanks so much for sharing all of this great information. I’m very new to foodblogging and photography and I’m finding that I am becoming obsessed with food photography! It feels so good to find talented people like yourself who are willing to share what they have learned! I’ll definitely be coming back often 🙂
Many thanks!
Those basics are always usefull for amateur photographer!
Really interesting and informative. I’m definitely going to start experimenting with this. Thanks!
I completely agree – what a great post! While I read this, I thought of about 15 photos I have taken in the past week that would have been improved by – bounce! I will implement this immediately! Thank you L!
Thanks for the tips L! I always find your posts so interesting and informative!
great post! I’ve never come across bounces before but will now be looking for styrofoam!
Thanks for this very helpful post. I just bought a new digital slr so I’m playing with & also trying to make my food photo’s look appealing.
Cheers!
Heather
This post recently saved a photo of mine. I was working outdoors with a strong light coming from the side. All of the shots were coming out with no definition on the other side. Then I remembered your styrofoam suggestion. As luck would have it, there was an old styrofoam cooler in the garage, and the lid worked perfectly as a bounce! If I hadn’t used it, I would have been left with less useful shots–or would have had to re-shoot with indoor light.
Thanks so much for this and all your other tips!
Another fine tutorial. I will have to experiment.
I [very synchronistic] just stumbled upon your fab blog. Thanks for this post [about bounce light]; I have been struggling with the lower angle/weaker light of autumn, and wondering how I would adjust come winter. Excellent info!
Just the kind of advise I’ve been looking for! We have been taking stills for the blog, brochures and such~ this will help!
I’m a bit of an addict when it comes to trying out new types of bounces and one of my favorites are these tiny mirrors you can get at craft stores. I prop up the 4″x4″ mirrors with a glass ice cube and it brings out a little touch of light here and there. There’s even 1″x1″ mirrors which I love to put into bowls/vases to get light bouncing around.
I’m love your site and visit frequently for photographic inspiration and education. Thanks for sharing all this great info (and beautiful imagery) with us!
Thanks for such an easy to read and understand lesson on bounce. Other sites I have seen make the subject overwhelming. This site is beautifully done!
thanks so much for this post. who knew foam was so valuable.
Thank you for this sharing, I am so glad to read whatever you have posted, it is so informative. My wife is running a blog for food (It written in french language), together we are trying to make the photos look nicer with better colors and lights. We found your instructions and tricks so helpful that we are thinking to by all the necessary staff to improve the shots.
Thanks and my best regards
Experimenting with bounces & fills is really worth the time! Brown kraft paper (or paper grocery bag over rigid board)is also a great fill that can add a subtle natural warmth to the subject.