Hard as Pie

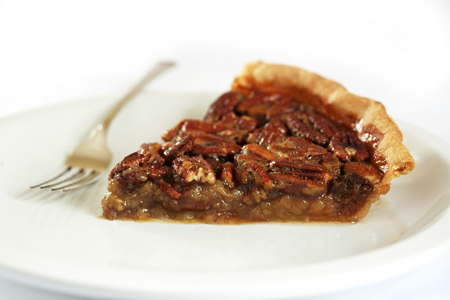
As the holiday season approaches, food styling needs start to kick into higher gear. Food is such a critical part of the holidays, and making food look good, even more so. It’s all turkeys, stuffing, cookies, cakes and pies. Especially pies. I recently shot a pecan pie for a regional magazine. The pie was baked in a local bakery, and I had the whole pie to work with to get a shot of a single slice, on a white plate, on a white background to allow lots of room for text to be placed all around. Styling pie is not particularly easy, and this particular pie, while mind-blowingly delicious, didn’t make it easier. When styling pie, you really want something that can hold it’s height fairly easily, with a nice thick bottom crust. This pie loved to sink and while the outer crust was incredibly thick, the bottom was almost nonexistent. Still, I thought it might be nice to show you a little walkthrough of the shot.
Before we get to the shots, I should back up and tell you about the pie itself. While I got it from the bakery, I had talked with the pastry chef before hand. They gave me a pie that was basically cooked, but pretty lightly. I brought the pie home, and then finished the baking at home, so the pie filling wouldn’t look gummy and the crust wouldn’t be overly brown. Now, with pecan pie, this probably was a lot less necessary, especially since a pecan pie really needs to cool before you can slice it, or it will just run all over the place. That said, you don’t want it cold, or the filling will look less appetizing. One of the trickiest parts of pie is finding that balance between firm but cool, and warm but runny. I went for a medium brown on the crust, and let it sit for about 15 minutes at room temperature before slicing.
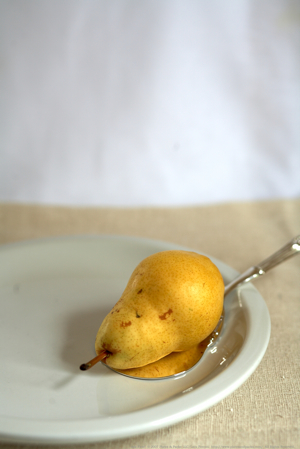
While the pie was cooling, I started doing some test sets using whatever happened to be sitting in my studio as the dummy hero. In case you haven’t heard that term, the hero is the main subject of the shot. In my case, my dummy was a pear from an earlier shoot. I placed it about where I wanted the pie slice to be and just played with the lighting some. Note, lots of problems here, that at the time I didn’t care about. I was just trying out fabric, angles and props. Once I decided on a fabric, I’d worry about ironing.
With the pie about cool, I pull my slice. Not exactly photo worthy! It’s all sprawled over the plate. It kind of looks like someone stepped on it. And, while it has a bit of rustic charm, it’s not the look I was going for. But, believe it or not, this slice did end up being my hero. It just took some playing with first. To begin with, I needed to add some height, particularly in the front. I carefully removed the top pecans and set them aside. (Sorry there are no photos of this work, but my hands were covered in sticky filling). Then, I started scavenging from the rest of the pie, pulling out thicker pieces of filling and hand placing them in the hero slice, until I got a thickness that was a bit higher than I needed (knowing it would sink). I then replaced the pecans on top, moving them around as necessary. I liked the sliced pecan showing white on the edge, so I made sure I worked the other pecans around that. Then, the smoothing started. Most of this was just done with a knife, kind of swiping upward (keeping the height) until there was a good edge. Oh, and that beige color cloth wasn’t doing it for me, so I took it out.
At this point, it’s important to work quickly. Every second the pie sits there, it will sink. Gravity is trying to undo all that height you added. So I only am doing this on one side of the pie… the one that is going to appear in the shot. The other side doesn’t have to be cleaned up, unless you are doing a shot staring down the point.
Once the pie is all smooth, I start some clean up. I use a wet (just with water) cotton swab to clean up most of the mess. In particular, with this pie, there was a tendency for an oily layer to build up on the edge of the bottom crust that made it look less appetizing.
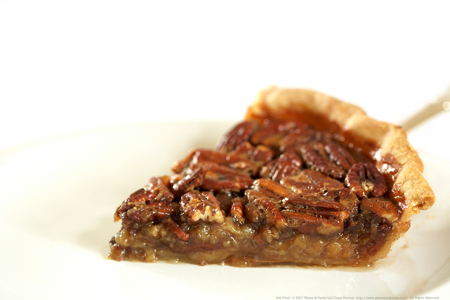
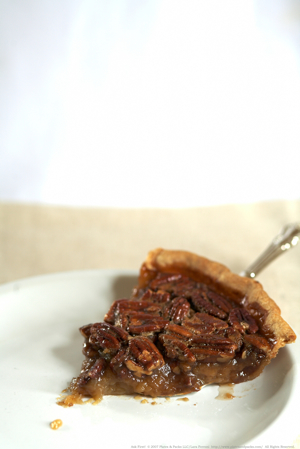
Then, I start shooting again. Planning the shot with the dummy helps get the basic shot, but I really never know exactly what I’m going to do until I get the hero in place. In this case, I decided to completely change the orientation of the shot, to get much closer to the pie and really get the texture of the pecans and the filling.
After a few shots recomposing, I start to notice that I need some styling touch-ups. The tip of the pie is jagged and sagging. A bit of patch material (taken from the remaining pie) fixes that up easily.

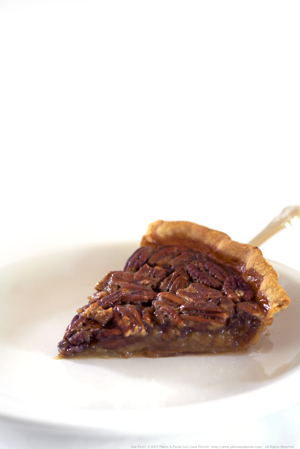
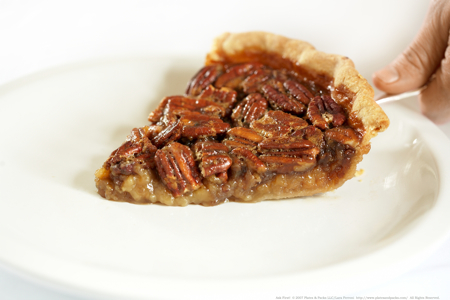
The pie is looking good, but I need to reframe some, as there will be text below the pie. And then, for the final touch… my hand.
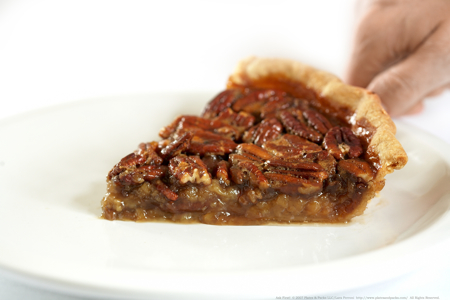
Honestly, I hate being my own hand model. My hands are too pink and stubby. It’s frightening, but my 13 year old daughter hands that look less childlike than mine. But, she wasn’t around, so I got to pose myself. Luckily, the camera was pretty close to the set, so I could take the shot with my wired remote (got to get myself a wireless) instead of a timer which I hate.
Remember how I said that you have to move quickly? If I hadn’t gotten my shot in, I was going to be rebuilding pie! Actually, as it turns out, I was rebuilding pie (from a new cut piece) anyway, this time on a smaller plate so that the designer had more flexibility in cropping. As a photographer, it’s always a good idea to see the layout the designer wants before shooting… or you may end up wasting a bunch of time.
For those of you interested in the more technical details of this shot, the final was done with a 100mm at f4.5, tripod (of course!!!) and natural light coming directly from the right and about 45 degrees from the left/behind. The light was not diffused, but the table was set about 3 feet away from the window to the right and about 2 feet in front of and 2 feet to the right of the window to the left. I exposed for the pie, blowing out the background some in camera, and then used Photoshop to finish blow out the white fabric entirely, along with some of the plate, just to give the sense of a plate and to let the pie really pop. I did some color modification on my hand to remove some of the pinkness, and lightened it a bit to take away focus.
Oh, and yes, we did eat the rest of the pie afterwards… the styled pieces were still edible, but well, my hands had kind of been all over them, so they didn’t get eaten.
Technorati Tags: Food, Food Styling, Photography, prop styling
L –
There are many things I’m willing to step in and lend a helping hand on, and PIE SURE AIN’T ONE OF THEM!
You have completely earned the BRAVOS here… you managed to capture a great shot of a difficult pie and made it so appetizing!
(I shot pies with stylist William Smith 2 weeks ago and remained in awe for the entire day. I’d never want that challenge – EVER!)
terrific post!
Long-time reader, this post made me de-lurk! Wow, I really appreciate how you walked us through this shot. Every day I take more food photos I realize how much goes behind each one. It’s wonderful to have seen part of the process.
I will never look at another food shot the same again–I thank you so much for the step by step process of getting this photo! So insightful. and generous of you to share.
Loved the post! I’ve been involved with holiday food shots: coffee, cookies, spices etc… but no pie so far. And after reading your post, I thought “thank goodness!!.” Thanks for sharing, kudos to your beautiful shot. It’s even more impressive now, knowing the work that goes behind it.
I have to ask – if you know the pie sinks, would you still post this perfect picture with a recipe for that sinking pie? I have to tell you that I feel like a failure so many times, esp at baking, because what I made is nothing like what’s in the picture. More so when I have obsessed and followed the recipe exactly.
That aside, this is a fabulous tutorial! Thanks!
Hi Manisha,
All pies will sink when a slice is pulled out given a little bit of time, some more quickly than others. I didn’t mean to say that there was a problem with the recipe, and that the pie sank when whole. It’s just a slice no longer has anything to hold it up on the sides.
As to whether I’d style it or not… that depends on the client and the use of the photo. For my own blog, I’d clean it up some, but I probably wouldn’t rebuild it… That would be counter to the messier style of the photography that is there. Many cookbooks and magazines take this same approach, and don’t worry if the food looks very “real.” But, in the overall world of food styling, it’s pretty rare, and most stylists would probably have done even more than I did here to bulk up the pie.
Thanks all for your comments!
What a great post! Thanks for the walk-through. Very informative. If it were me, though, I think I’d have the whole pie eaten (hands all over them or not)before I got the shot…
I know that on many commercial product shoots, substitutions, shelaques, adhesives and other inedible items are used. I’d love to learn to properly use them, but at this stage can’t rationalize destroying food for a photoshoot. So I guess my question is, how frequently are you able to eat the subjects of your work?
Very true… most commerical shoots use all kinds of food styling tricks that make the food unedible… vaseline and Pam kitchen spray are a few of them. For large shoots, where you have food stylists prepping food that needs to last all day or many days, it’s kind of a necessity. My work is on a much, much smaller scale, so I don’t do any of that.
But, there are times that I wouldn’t eat the dish that I made.. not because I treated it with anything toxic, but because it’s been sitting out for a few hours. It’s never a good idea to eat anything meat-based that has just been sitting at room temp for a half a day!
And, as I said with this pie, I didn’t eat the slices that I styled because I had been touching them for a while. I did lick my fingers between adjustments though 🙂
For my blog, on the other hand, everything is edible and eaten.
-L
Hey thanks for that clarfication and taking that in the spirit it was meant! As for the pictures in your blog, “messy” is not a word I would use for them! Not by a long shot!
Pie is the hardest, isn’t it? I had to do a grape pie once but couldn’t find any dark grapes…so I used olives! Excellent post…except now I’m craving a wedge of pecan pie, fondled or not.
I’ve been lurking around your site for quite a while now, so I finally decided it was time to join in. Your pie slice looks wonderful! Having styled a few pie slices myself, I can really appreciate all you did to make this slice look very appetizing.
Gelatin! A little dissolved gelatin in your filling, allowed to set, would have given your pie the gravity defying structure it needed. A little heat (hairdryer perhaps) applied along the cut as well as a little downward pressure applied to the top would have given it the ooze factor. While the outer edge could have been warm and runny(er), the interior could have remained cool and set.
awesome post!
i love your website.
these walkthroughs are wonderful, i’d love to read more about how you work!
Thank you for having such artful photographs on your site. I found your blog to be extremely informative as well as inspiring.
Aii, I wish I’d read this yesterday, BEFORE doing my own Thanksgiving pie shot. Mine’s more in the ‘rustic’ mode, I’m afraid. Thanks for all the tips, Lara. I’m amazed at how ALL of us have improved our shots in the last year, even those of us who are decidedly/happily amateurs.
that pie looks good!!!!!!!!!!